

Planner Views allows you to setup predefined views for the Planner which can be shared with Employees.
Employees simply choose from their own private list of Planner Views as well as any that have been shared with them when they are viewing their Planner:
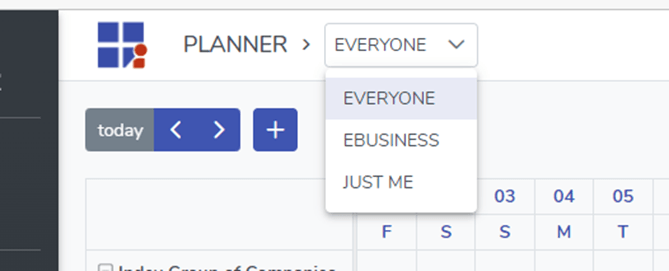
If you needed to create a single view of all Employees across a select number of Departments or Locations and make this view available to everyone to see then Planner Views is the answer.
It’s important to understand that Planner Views only allow you to define what and how Employees are shown on the Planner and who it is shared with, it does not provide any additional access to the data you have selected to view. This means that if an Employee using your Planner View does not have the access to view the resulting Employees in the Planner View then no data will be displayed for them.
Quite simply, if they don’t already have the permission to view the Employee data in the Planner View then they won’t see anything on the Planner.
Each Planner View you create has the following settings that control what Employees to include on the Planner, how to display them and who can use it:
Main
Name
The name of the Planner View. This will be displayed in the drop-down list of Planner Views to Employees who have been granted access to it.
Content
View
The Calendar mode you would like to use which is one of the following:
- Timeline day – Displays the Calendar as a single day in grid format
- Timeline week – Displays the Calendar as a single week in grid format
- Timeline month – Displays the Calendar as a single month in grid format
- Classic – Displays the Calendar as a single month in block format
Initial date
The initial date to use when loading the Calendar. You can choose one of the following:
- Current month
- Current week
- Current leave year – this would be based on the current Employee logged in
- Specific month this year
Number of Months
When the Content – View is set to Timeline Month or Classic how many months should be displayed
Include on planner
Select the type of information you would like to display on the Calendar
Leave Types
If you selected Leave in “Include on planner“ which types of Leave do you want to display?
Timeline options
Employee Grouping
Choose how you would like the Employees to be grouped:
- Group by department tree
- Group by department flattened
- No grouping
Classic options (these settings only apply when Content – View is set to Classic)
Background colour
When displaying Leave entries on the Calendar choose what colour you would like to use for the background:
- Department – the background colour is taken from the Department colour
- Leave type – the background colour is taken from the Leave Type colour
When Department colour is selected any Authorised leave will have the same colour as Unauthorised leave.
Group by leave type?
If you want to display all leave types grouped together then tick this box otherwise the list is alphabetical by Employee name.
Filtering
Filter for
The “Filter for” defines the Employee data that the Planner View will display, and the available options are:
- Companies – display all Employees from the selected Company(s)
- Departments – display all Employees from the selected Department(s)
- Employees – display the selected Employees
- Employee Roles – display all Employees in the selected Employee Role(s)
- Everyone – display every Employee
- Locations – display all Employees from the selected Location(s)
- Just Me – only display the currently logged in Employee
Sharing
Share with
The “Share with” works in a similar fashion to “Filter for” but this time you are selecting the Employees that can use this Planner View. Any Employees you select must already have the permission to view the data selected in “filter for” otherwise they will not see any data on the Planner. The available options are:
- Companies – share with all Employees from the selected Company(s)
- Departments – share with all Employees from the selected Department(s)
- Employees – share with the selected Employees
- Employee Roles – share with all Employees in the selected Employee Role(s)
- Everyone – share with every Employee
- Locations – share with all Employees from the selected Location(s)
iCal Options
Enable iCal feed
If iCal is enabled for your Organisation then ticking this box will allow you to use the data exported from this Planner View in external applications like Microsoft Outlook and Google Calendar.
Your feed url
This is the URL to use when importing the data into your external Applications like Outlook and Google.