The Directory presents a view of all the employees that the currently logged in user has the permission to see. The information they see is controlled from the Employee Roles that the logged in user belongs to as well as any Employee Attributes that have been marked Visible to All Employees.
When the logged in user has the permission to view more detail about an employee they can click on the employee to view their Employee Detail. Employees can also click on their own names to view their Employee Detail record where they can view, propose and edit their own data depending on the permission levels that have been setup.
New users can also be added to the system from here by users with the appropriate permission by clicking the Add Employee button at the top.
Directory List
The Directory list can be customised, filtered and represented in a few different ways and each user can setup and choose the best view that suits them.
Filtering
There are 2 different types of filter that can be used to help you limit the number of employees you see in your Directory.
1. View Level Filters
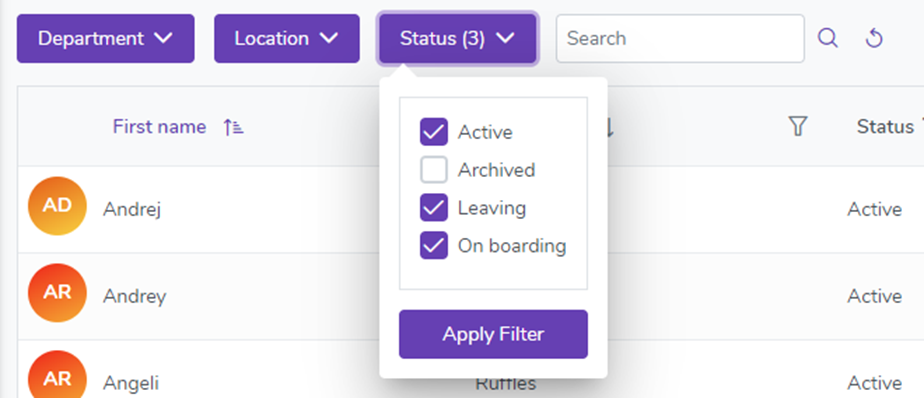
At the top of every view are 3 drop-down lists for Department, Location and Status. You filter your employee lists by selecting one or more of these options and clicking Apply Filter.
2. Field Level Filters

When in List View mode individual fields can have their own custom filters set by clicking the filter icon next to the column name. You can define multiple filters per field giving you the most flexibility possible.
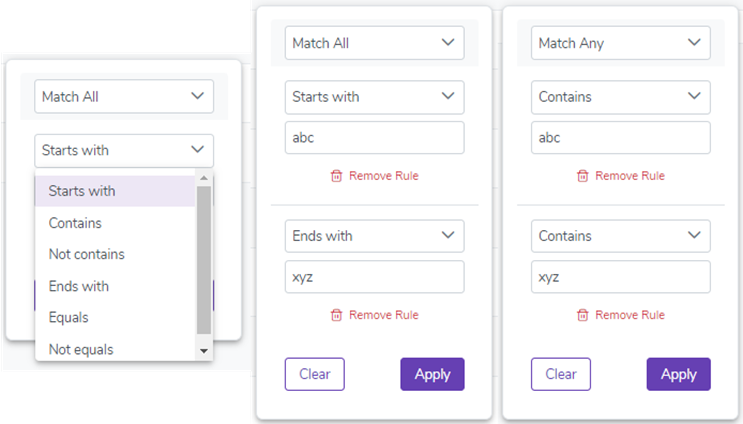
Any filters you define here are stored locally within your web browser so the next time you login using the same computer your filters will still apply.
Directory Views
There are 3 different types of view you can choose from when viewing the Directory data.
1. List View
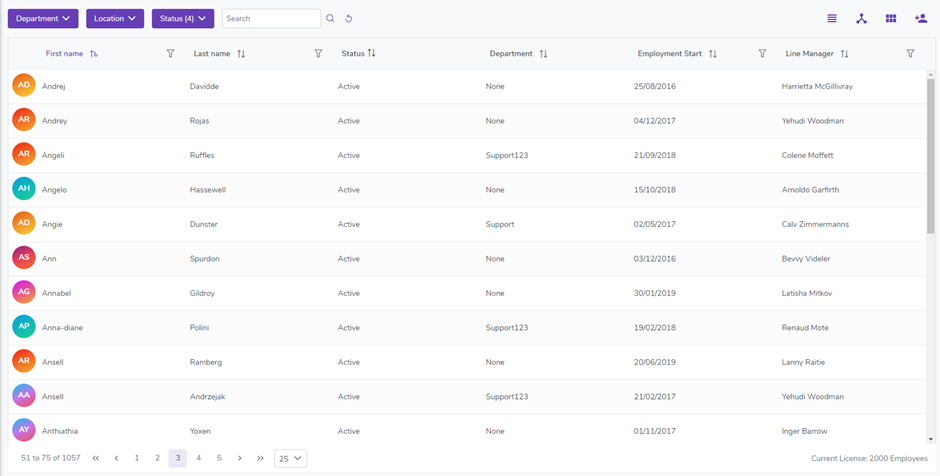
This is a classic list view where users can control the columns they see in the list. Users can also setup Field Level Filters to limit the resulting data.
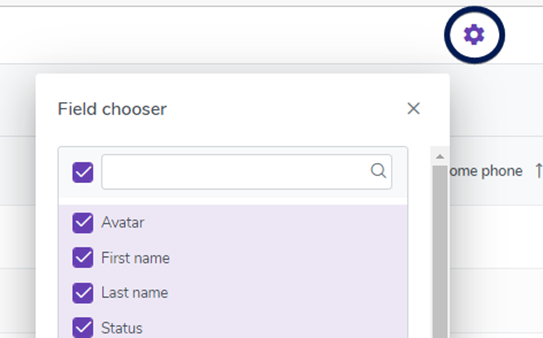
To choose which fields you wish to see in the list click the Cog at the top of the screen and tick the box next to the fieldname.
2. Organisational Chart View
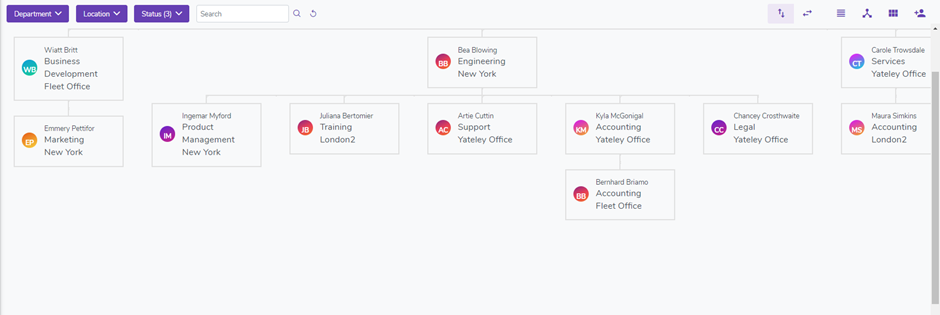
The Organisational Chart view uses the Line Manager field to build an overview of the structure for your Organisation.

You can choose from Vertical or Horizontal modes using the tool bar icons highlighted above.
3. Card View
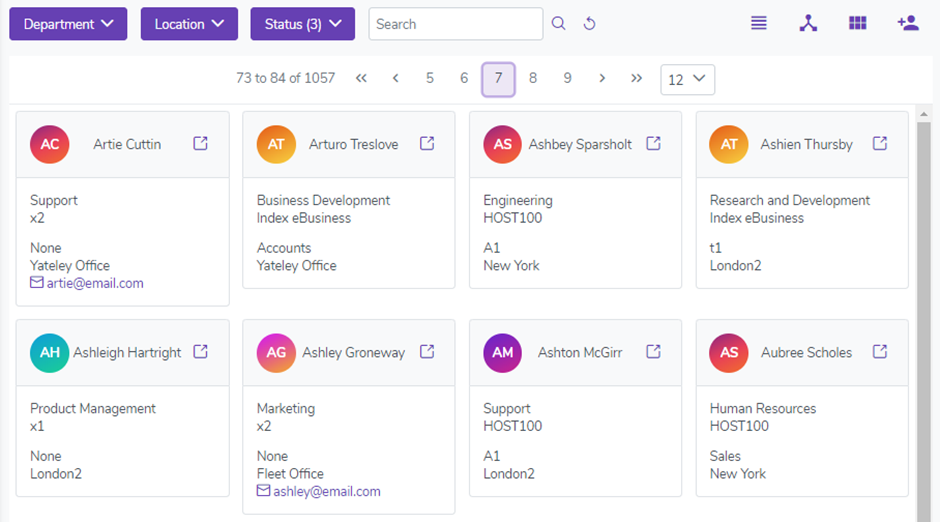
Card View mode provides the user with essential contact information for employees.
Employee Detail
The Employee Detail area provides access to all the information for a single employee where the level of detail that the logged in user has access to is strictly controlled via Employee Roles.
If the logged in user does not have the permission to view a particular section for the employee then that section will not appear in their menu.
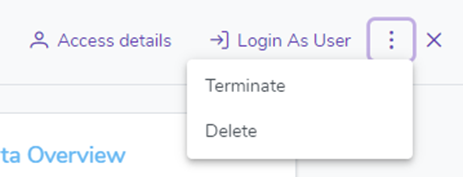
Running along the top of every section is a menu where every Administrator can edit the Access details for the employee and test their permissions by logging in as that user. They can also Terminate or Delete the employee. If you Terminate an employee, you invoke the Employment Termination Wizard which helps calculate any leave entitlement and transfers any Authorisation duties for the employee. When you Delete an employee, they are simply removed from the system.
Access details
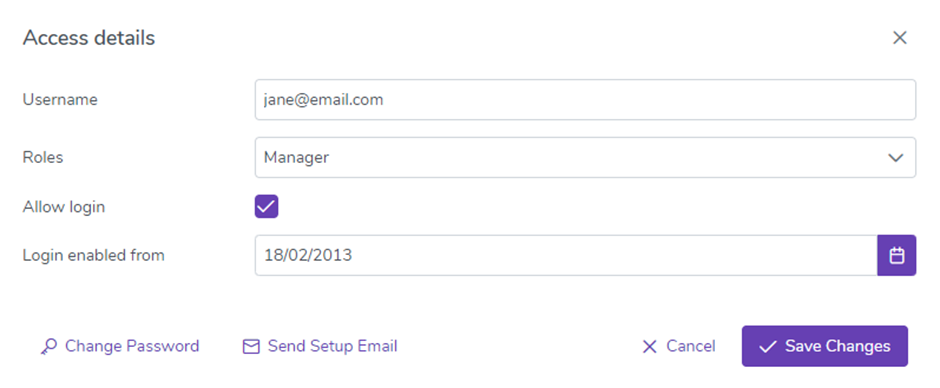
The login information for the employee is controlled from the Access details area. As well as changing their username and password you can also add or remove the Employee Roles that this employee belongs to.
If you are adding a new starter and they don’t start for a couple of months you can choose to only enable their login nearer their start date. This would allow them time to access the system, setup their personal details and review any Company Documents before they start.
The Employee Detail area is divided into the following 11 different tabs.
1. Overview
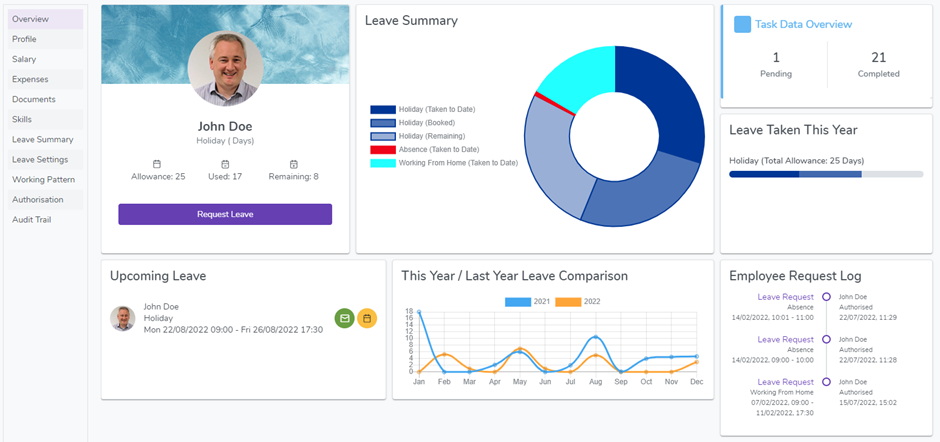
The Overview tab provides you with a visual summary of the data that is important to you about the currently selected employee.
This tab can be fully customised in the same way that the Dashboard can and indeed it shares a lot of the same Widget Types however the Content Type filter cannot be set here as the data is always set to the currently selected employee. The only widget that is not available in this section is Upcoming Birthdays.
You are encouraged to add, remove and customise your widgets by using the Cog icon at the top of the screen. Any change you make will only apply for you and will persist across all the employees that you view.
Set as Tenant Default/Restore to Default
Every user can define their own Employee Overview layout that they wish to use when they view an employee, and every Tenant/Organisation has a default Employee Overview layout that is assigned to all new users. You can set that default layout by using the Set as Tenant menu option. To reset your current Employee Overview layout back to the default use the Restore to Default menu option.
2. Profile
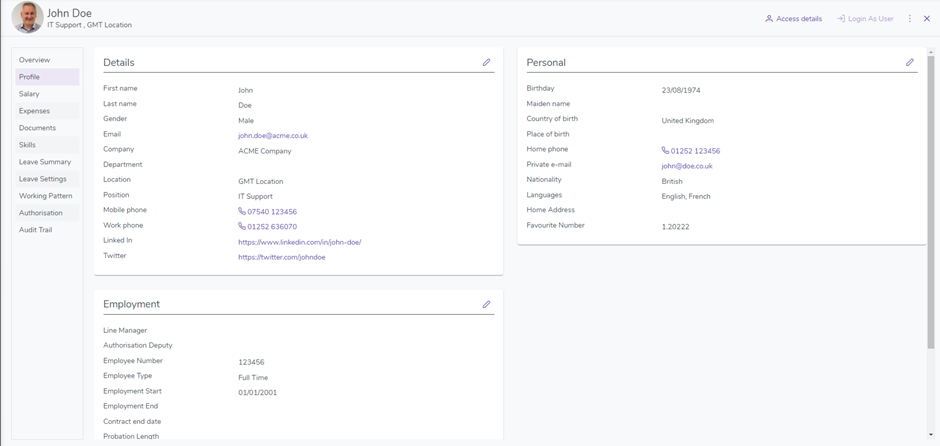
The Profile tab displays all of the Employee Attributes that the currently logged in user has the permission to see. If the user also has Propose or Edit access to one or more of the sections, like Details, they will see a Pen icon  in the top right corner of the sections they have access to. Clicking on the Pen icon will put them into edit mode for that section.
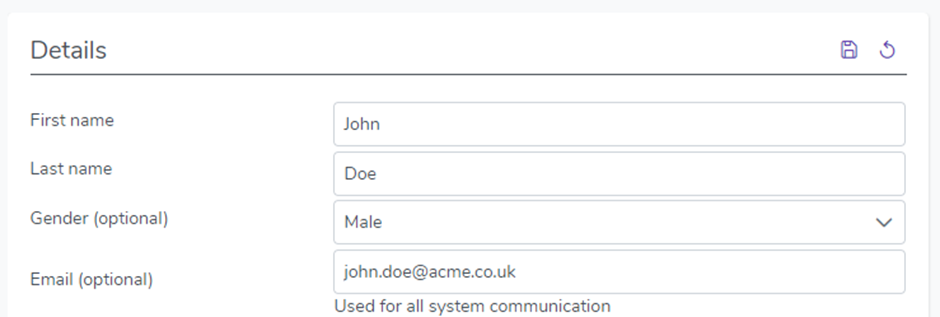
Once the user has finished making their changes, they simply click the Save icon  to commit them or the reset icon to commit them or the reset icon
 to undo those changes.
If the user has Propose access to the section they made changes to then those changes are sent to their Profile Change Authoriser for authorisation. If the user has Edit access then the changes are saved straight away with no authorisation required.
N.B. If a user has Propose access but there is no “Profile change” Authoriser defined for them then the changes that were made are also saved straight away as no authorisation is required.
3. Salary
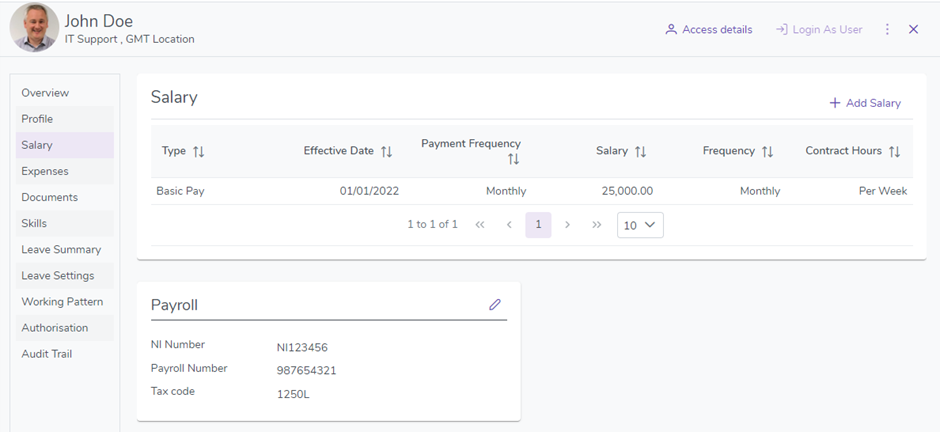
The Salary tab provides access to the employee’s current and historical salary records. This could be Basic Pay, overtime rates, Bonuses or any other Salary Type that you need to track. Additional Salary Types can be added by editing the Salary Type Attribute in Employee – Attributes. Any additional Salary Attributes that have been setup will also be displayed and used here.
4. Expenses
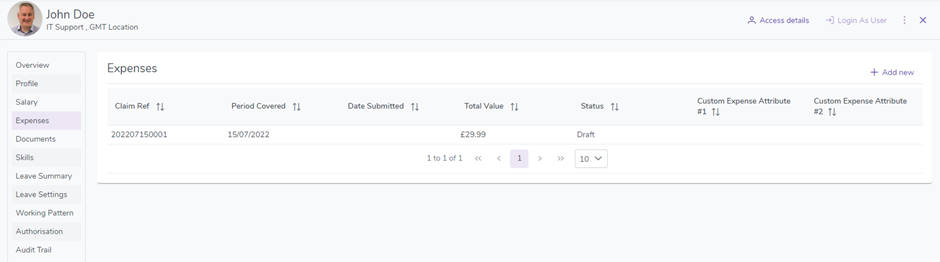
The Expenses tab is for tracking individual employee expenses. By default Employees can create Expense Claims which have one or more Claim Items and then submit them for Approval according to their Expenses Authorisation Process.
Claim
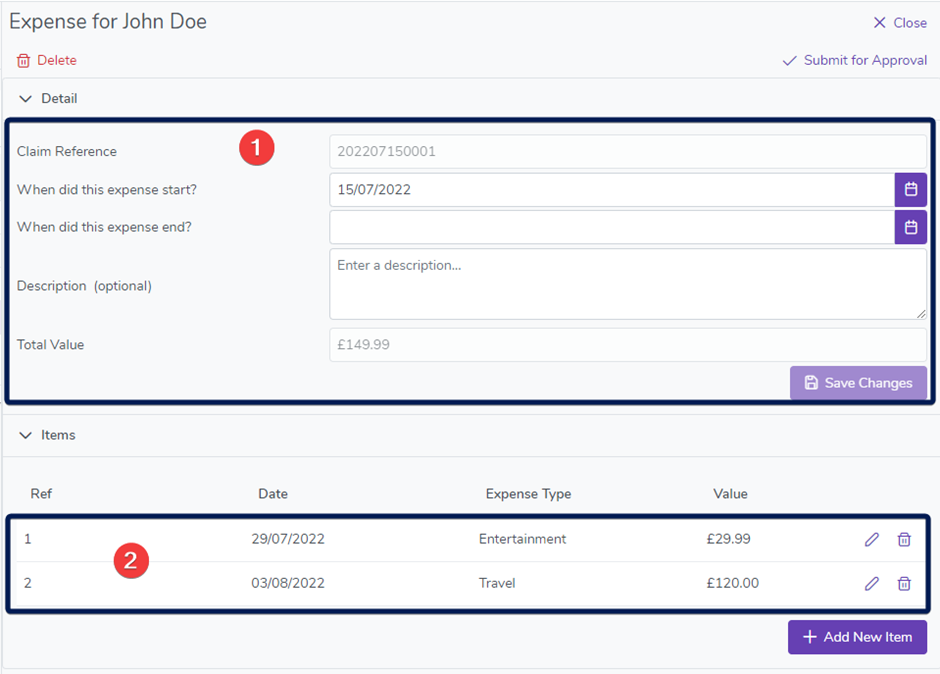
Every Expense is made up of a Claim along with one or more Claim Items. The Claim has a Start Date and End Date which should cover all the attached Claim Items being submitted. The Total Value for the Claim is automatically calculated from its Claim Items.
In the screenshot above the Claim information is highlighted by (1).
Claim Item
A Claim Item is the individual expense details along with the accompanying photographic or electronic evidence (if required).
In the screenshot above the Claim currently has 2 Claim Items which are being highlighted by (2).
5. Documents
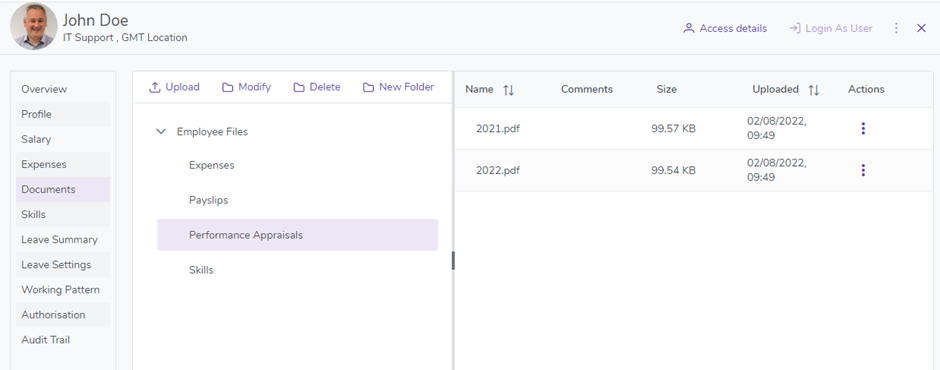
The Documents tab provides access to all of the electronic files for the currently selected employee. Any user with Edit access to the Employee Roles->Directory->Documents section for an employee would be able to upload, edit and delete files on this tab.
Any of the following document types can be uploaded on this tab:
- Word
- Excel
- PowerPoint
- CSV
- Text
- Any Image (BMP, PNG, JPEG, JPG, GIF, TIF, TIFF)
Any user, including the employee themself, would need View access to view and download documents from this tab.
6. Skills
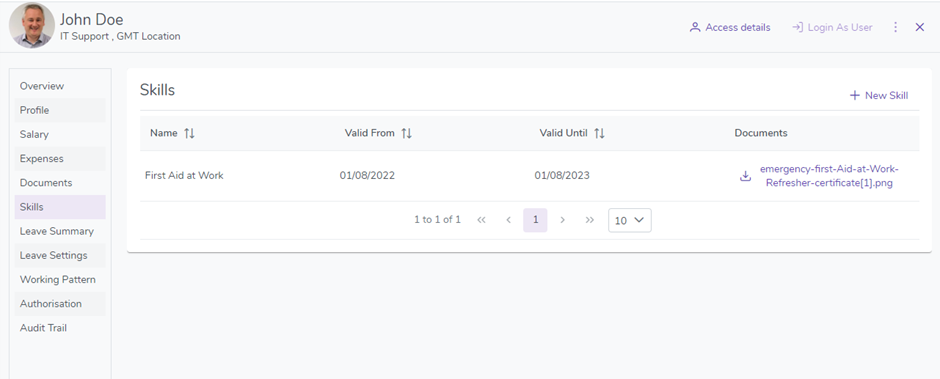
The Skills tab provides access to the Skills and Certifications for the currently selected employee.
You can use this area to monitor and record both simple and complex Skills and optionally be alerted when an employee’s Certificate is coming up for renewal.
By default Employees can request that a Skill is added to their record along with one or more Certificates and then submit it for Approval according to their Skills Authorisation Process.
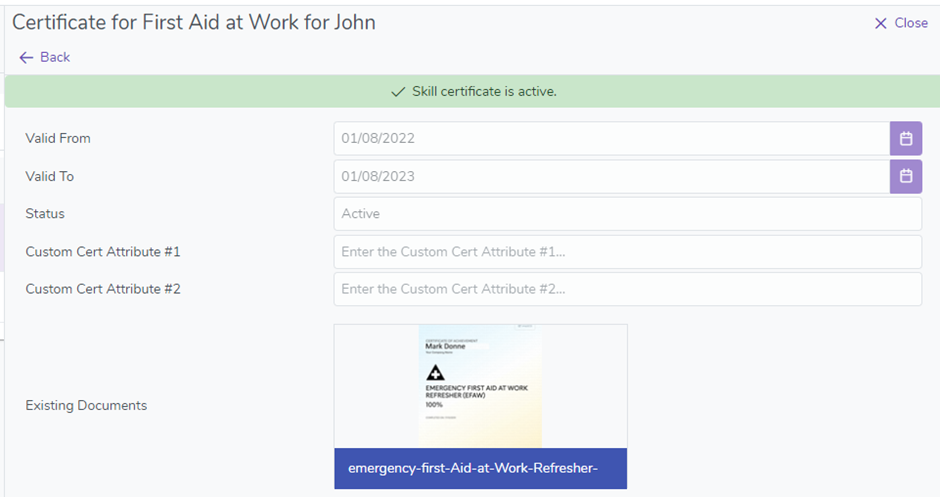
A good example of a Skill would be “First Aid at Work”. Once an employee had attained the “First Aid at Work” Skill they would request it themselves and upload the accompanying Certificate as proof. The expiration date on the Certificate would then be used to generate the reminders to renew it.
A Skill must already be setup at the Organisation or Company level in order for the employee to be able to request it.
7. Leave Summary
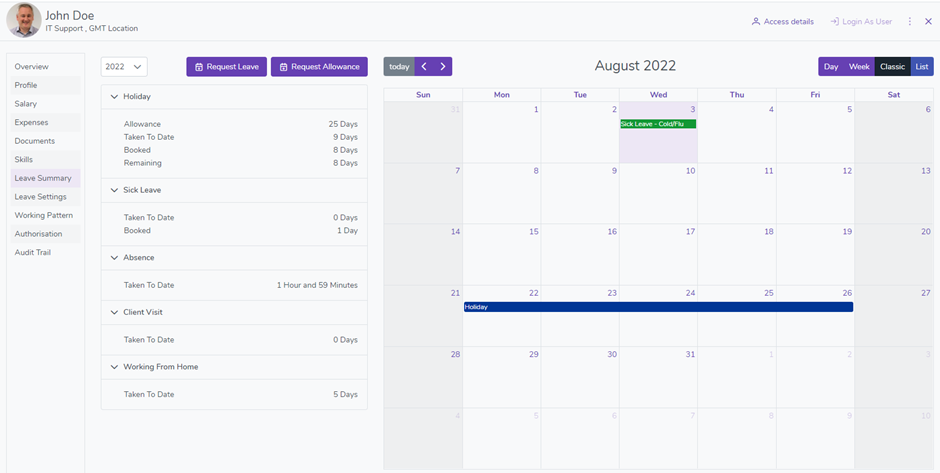
The Leave Summary tab provides all of the information on past, present and future Leave that has been Requested and Authorised for this employee as well as the current balance of any allowances that are in place.

You can review previous and future years by selecting the year from the drop down list at the top. New Leave can be requested using the Request Leave button and allowance change requests can be made using the Request Allowance button.
When viewing the leave on the Calendar for an employee you can change between Day, Week or Month or you can view it as simple List.
8. Leave Settings
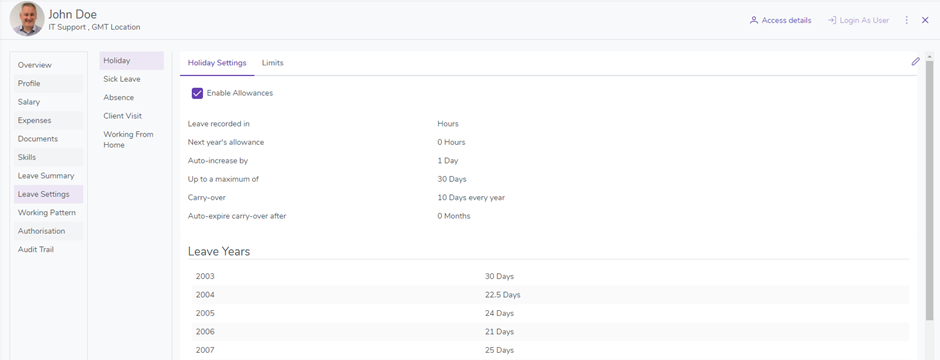
The Leave Settings tab is where you can make changes to the default Allowance and Request Limits that have been granted to this employee.
A user would need to have Edit access to both the Leave Type(s) (Employee Roles->Leave) and the currently selected employee (Employee Roles->Directory->Leave Settings) in order to be able to edit the information on this tab.
9. Working Pattern
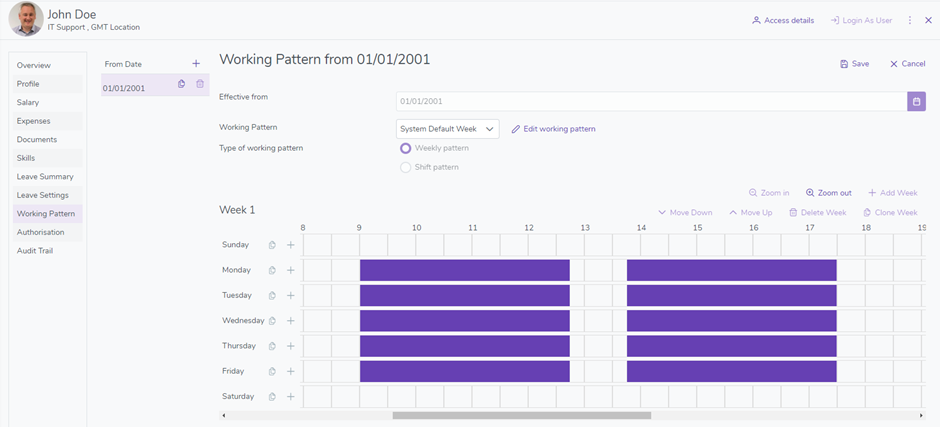
The Working Pattern tab is where you can review and make changes to the rota for the currently selected employee.
The rota for a Working Pattern can either be defined using Weekly Patterns or Shift Patterns according to your needs.
Weekly Pattern
This is the most used type of Working Pattern where an employee can be defined as working on set days. A Working Pattern will automatically repeat when it reaches the end so a single week will repeat every week and a double week will repeat every 2 weeks.
Here is an example of a Weekly Pattern where the employee works every other day across two weeks.
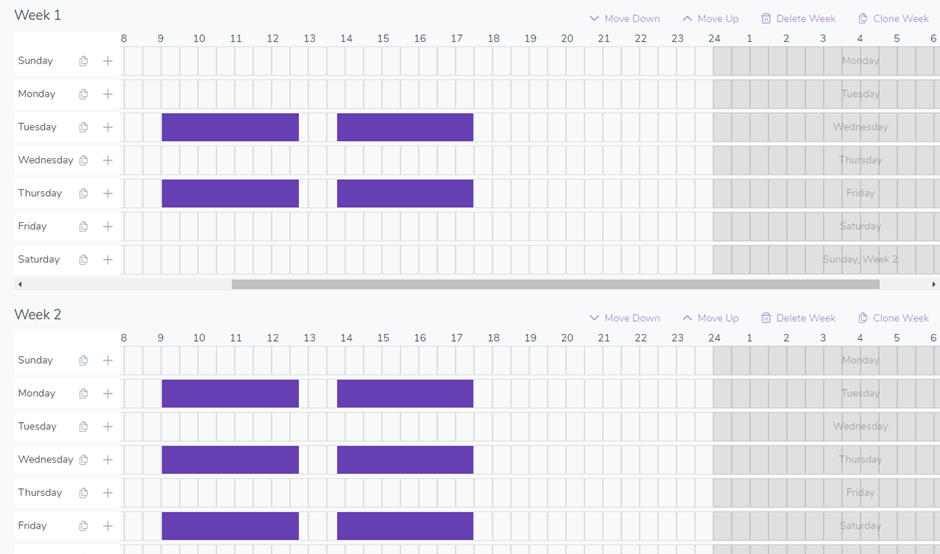
On Week 1 the employee works on Tuesday and Thursday and then the next week they work on Monday, Wednesday and Friday. The following week (Week 3) we start again with Week 1.
Shift Pattern
Shift Pattern allows a schedule of working where employees can be rostered to work in rotation, for example, the two-shift system rotates two teams of staff working mornings and afternoons, typically 6am-2pm and 2pm-10pm.
Here is an example of the two-shift Working Pattern for a single employee who works 6am-2pm on a four day on four day off and then 2pm-10pm also on a four day on four day off.
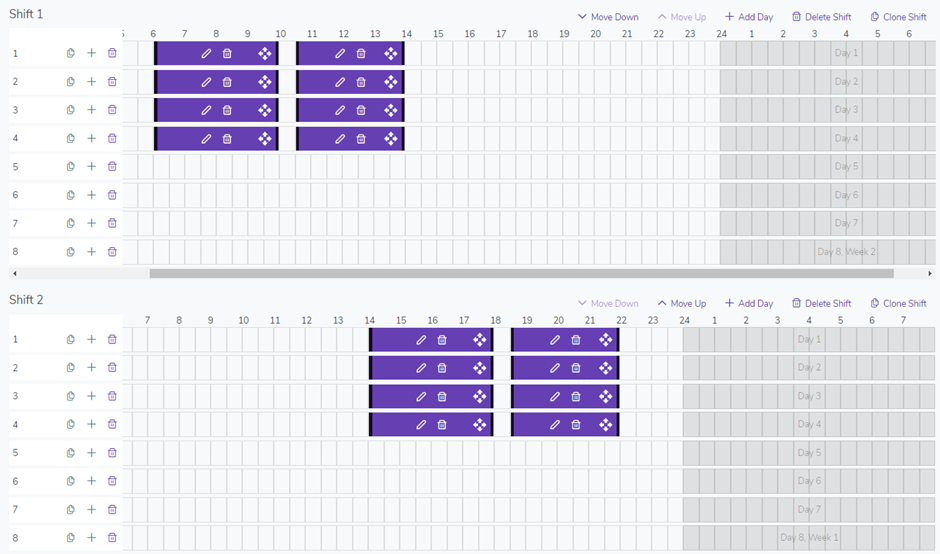
At the end of the Shift 2 the first shift will start over again.
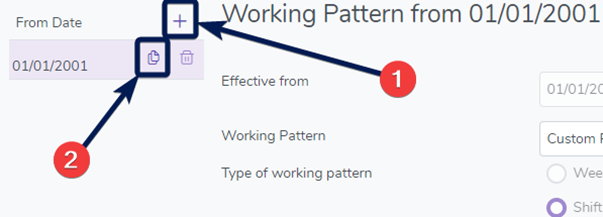
To create a new blank Working Pattern click on the + icon indicated in the screenshot above by (1).
If you want to copy an existing Working Pattern and make a change to it, you can use the Clone icon which is indicated in the screenshot above by (2).
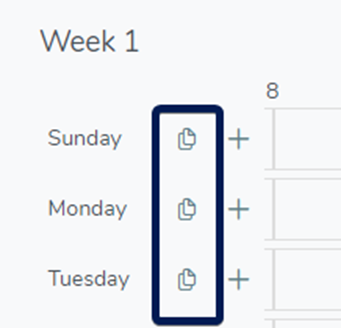
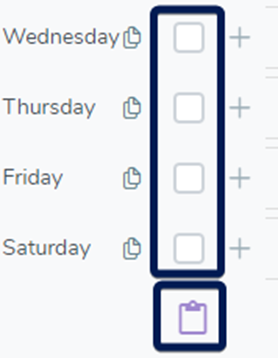
When editing a Working Pattern you can quickly copy and paste the working periods for a single day to other days by using the copy and paste icons as follows:
Step 1 – Click the Copy icon next to the day you wish to copy from
Step 2 – Select the days you wish to copy to and then click the Paste icon at the bottom
10. Authorisation
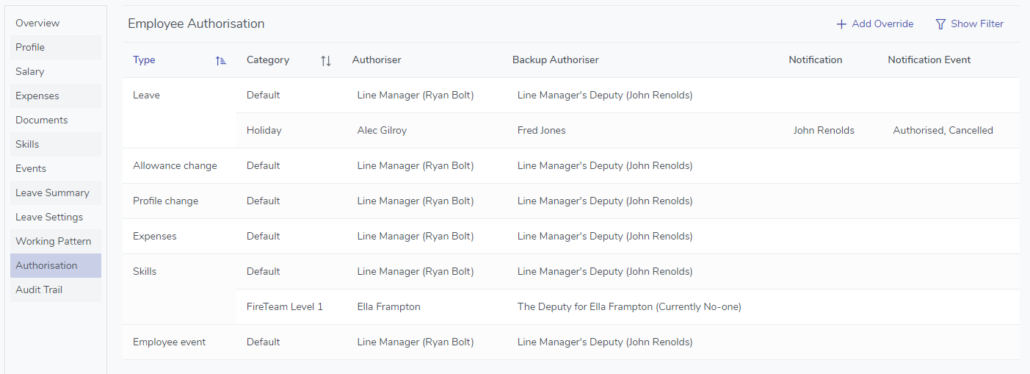
The Authorisation tab is where you can review and make changes to the Employee Level Authorisation Process for the currently selected employee.
11. Audit Trail
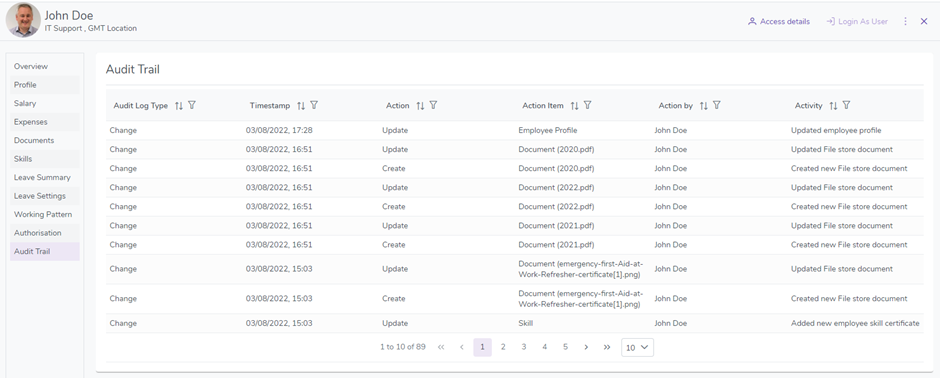
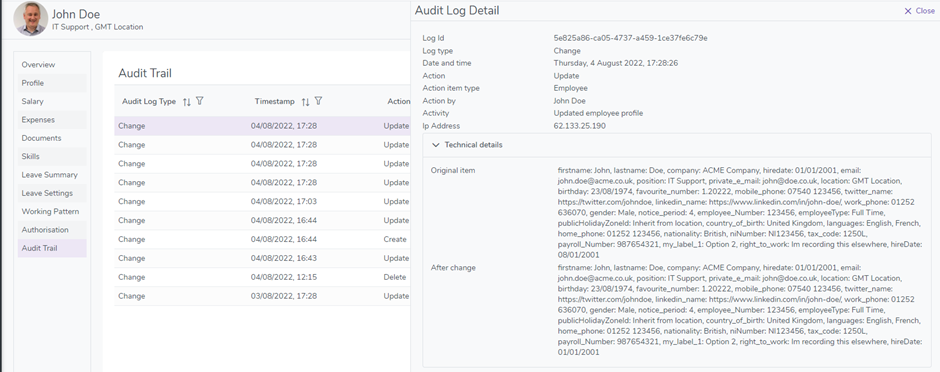
The Audit Trail tab allows you to review the history of changes that have been made to this employee and the logins that have been performed by this employee.
You can quickly filter the data using the column headings along the top of the table.
Click on any row to view more detail about the event. If the event is a “Change” event then you can also review the before and after snapshot of the data.